
Leshy Prelude
Leshy Prelude - Unity + Teamcity + Perforce CI/CD
Note to followers of this project:
This is not an update to the game. I've still been working on the aforementioned story updates along with the various pieces of feedback I've received. I've paused deployment of new builds for reasons that will be detailed in this post. This is simply a tech discussion on deployment procedures for the game.
Introduction
So we got our steamworks page approved! But after poring over the documentation I realized that maintaining 4 builds and deploying them was going to start becoming a bit cumbersome (Itch-Windows, Itch-Linux, Steam-Windows, Steam-Linux). I was able to get away with manual builds and deployment up till now since it was only 2 builds that I was pushing, but steam has a very particular set of rules about deployment which would easily add another 30-40 minutes per build in manual work.
So I decided it was finally time to bite the bullet and just work on continuous deployment.
THIS IS NOT A TUTORIAL! This is an incomplete implementation of the CI/CD implementation I decided on and the hurdles I encountered. I intend to refine/update it as my needs change. If it helps you then that's fantastic, if you have suggestions, they're welcome. If you have questions about how you'd want to improve a particular aspect, then they are also welcome.
Tech Stack
I have quite a bit of experience with Jetbrains Teamcity due to Arelith, so I decided that was the suite I was going to use to setup my continuous integration/deployment. They have a pretty liberal free plan for on-premises installations which would work perfectly for my purposes.
One change is that I'm going to be using Perforce as opposed to Git for VCS roots, the concepts should remain the same, but I'm sure I'll be running into some minor issues.
Initially, I was planning on hosting this on my DigitalOcean Debian droplet, so I could very easily port and create BASH scripts, but turns out that Teamcity needs a relatively beefy installation. So I wound up hosting it on my Windows machine and just press the button when it's ready for deployment. This necessitated a little bit of Powershell know-how, but the scripts detailed in this post can be pretty easily ported over to BASH.
Initial Troubles
My vision for this was a hosted instance of Teamcity on a Digitalocean droplet that was live 24/7. I could just open up the web-interface, click the button, and it would pull the latest changes from the Perforce depot and allow me to push live on itch/steam.

(The above highlights the final two build configurations where I'd send live to itch/steam)
After setting up Teamcity up on the droplet, however, I noticed that there was a minimum memory constraint of 2GB. I upgraded my droplet, but things were still extremely sluggish with absolutely no jobs running. To accommodate this sluggishness, I added quite a bit of swap memory with relatively high swappiness, but it seems that The disk performance on the droplets where nowhere near good enough to help.
After futilely messing with swap configuration parameters for a few hours, I realized that I simple wasn't going to overcome this spec requirement without paying a significant amount extra for my droplet.
I have a very beefy work computer, however, so I decided to setup Teamcity on my local Windows computer where I could run the jobs from. It was a (relative) breeze.
Local Windows Setup/Workflow
One of the first things I did was up the memory usage for Teamcity as I know that the Unity builds were going to be particularly hefty. I'd personally recommend just editing the internal properties in Administration -> Diagnostics -> Internal properties, but since I didn't want to waffle about I just added a global system variable `TEAMCITY_SERVER_MEM_OPTS` with a value of `-Xmx10g ` to give me 10 gigs of memory. With 32GB of memory, it should serve me well.
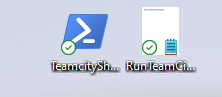
Normally, Teamcity is something you run and forget about using the helper batch/bash scripts in the bin directory, but since this was going to be on my local machine... It was something I'd have to easily turn off and on again. I didn't want to manually cd into the directories and run the scripts, so I just created a simple PowerShell script with an associated shortcut on my desktop:
# RunTeamCity.ps1
Start-Process "D:\TeamCity\bin\runAll.bat" -ArgumentList "start"
Start-Process "D:\BuildAgent\bin\agent.bat" -ArgumentList "start"
And then the shortcut that basically just runs the powershell script:
C:\Windows\System32\WindowsPowerShell\v1.0\powershell.exe -command C:\Users\dir\to\RunTeamCity.ps1
(I know that hardcoding the directories is bad, but this is a pretty irregular case)
Running the shortcut opens two terminals, one for the agent, and one for the Teamcity server. Closing the terminals closes the instances. Clean cut and easy to work with, I don't really have to worry about any annoying services or destroying anything from task manager.
So there we go, local setup on windows with easy activation/de-activation of Teamcity. First time I've done something like this locally on Windows so I was pleasantly surprised it was so easy to work with.
Building The Game
So I realize that Unity allows building from CLI, but the first rule of implementing a solution is to see if something more robust doesn't already exist. After all, they're likely going to have already dealt with all the hurdles you've dealt with.
(Sidenote: I broke this rule and initially implemented it via pure CLI but ran into organizational/coding issues so I decided to see follow my first rule)
Happy days! Jetbrains supplies a Unity plugin!
Sad days! Lots of reviews are stating that it's no longer supported and there are a lot of problems!
Regardless, I decided to take a shot at setting it up and working with it.
Right off the bat, I started encountering a major problem. The plugin simply would not recognize my Unity install with the `UNITY_HOME` environment variable or putting my editor install in the "expected directories".
I looked over the Github to see if there was something I was missing and noticed that there was an alternative solution for setting up the editor as an agent tool . I decided to go down this route.
Zipping up the editor took quite a bit of time and setting up the plugin took quite a bit of time (30-40 minutes). But after I had that, I thought it'd be as easy as clicking "Install Version" on the tools page and it'd be done pretty quickly.
Well, the Teamcity server was hanging for hours and it seems that force killing the instance and restarting wasn't actually bringing about any changes. My theory was that, since the editor zip was so large, it wasn't able to properly load it into memory for installation. At this point I only had ~2-4GB of memory to be used for the Teamcity instance.
I'm going to confess here that I didn't update the memory usage for Teamcity until this point, but I decided that saving your butt early on was a worthy sacrifice.
This is where I updated the memory usage (As I mentioned at the start of this tech discussion) and decided to retry the tool installation.
It hung again, but I let it run for about an hour and a half before deciding to kill it and see what happened.

Woo! The agent tool has been successfully installed! Though I'm not looking forward to undergoing this same ordeal for when we update the engine. It's a once-per-engine version update job though so it's not the end of the world.
Now that we have our agent tool installed, we can actually setup our build configurations for building the game.
To deal with one problem at a time, I decided to instead have the build to point to my local game directory instead of pulling from VCS.
First problem we have to deal with is how we're going to separate the itch build from steams DRM build. (You can't deploy a steam build to itch as it has DRM and would just crash if it doesn't detect a valid associated user.)
Thankfully I was using this handy Unity Steamworks.NET package for my Steamworks integration. It uses a pretty convenient preprocessor directive "DISABLESTEAMWORKS" that I can wrap around Steamworks specific functions to differentiate between itch and steam builds. It's just a matter of enabling/disabling that directive depending on the build.
To sort this out, we can utilize two of Unity's build features:
- Unity's CLI -executeMethod parameter.
- This allows us to execute a static method before the build actually begins.
- Build scripting define symbols
- This allows us to set define symbols before the build actually occurs.
To accomplish this, I created a "Builder" script.
!!!NOTE!!! THIS SCRIPT NEEDS TO BE IN YOUR `Assets/Editor/` folder.
//Builder.cs
using UnityEditor;
using UnityEditor.Build;
using UnityEditor.Build.Reporting;
using UnityEngine;
public class Builder
{
    static string DOTWEEN = "DOTWEEN";
    static string STEAMWORKS_NET = "STEAMWORKS_NET";
    static string NOSTEAM = "DISABLESTEAMWORKS";
    //[MenuItem("MyMenu/Check build settings")]
    // This function will be called from the build process
    public static void BuildSteam()
    {
        EditorApplication.ExecuteMenuItem("Assets/Open C# Project");
        PlayerSettings.SetScriptingDefineSymbols(NamedBuildTarget.Standalone, new string[] { DOTWEEN, STEAMWORKS_NET});
    }
    public static void BuildNoSteam()
    {
        EditorApplication.ExecuteMenuItem("Assets/Open C# Project");
        PlayerSettings.SetScriptingDefineSymbols(NamedBuildTarget.Standalone, new string[] { DOTWEEN, STEAMWORKS_NET, NOSTEAM });
    }
}
I just define the scripting define symbols as I need, and depending on whether I want it to build on Steam/NoSteam I set the scripting define symbols accordingly.
Open C# Project is... semi-required to generate .csproj files from a fresh pull of VCS. But it's not totally consistent, you can probably get away with not having it at all if you're directly pointing to your local working install.
If I was building from CLI then I'd have the following as an argument
-executeMethod Builder.BuildSteam
or
-executeMethod Builder.BuildNoSteam
depending on whether or not I want to build from Steam.
Now that we have our gameplan and build setup, now we got to setup our project parameters.

EXE_NAME is pretty self-explanatory.
GAME_ROOT is if you want to use your local working install. If you want to eventually use pure VCS you don't need this.
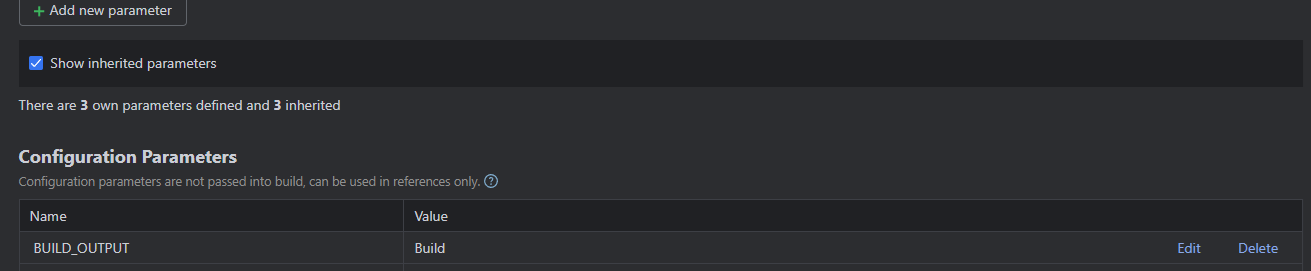
Scratch directory is something I like to include in all my Teamcity setups as it's convenient to work in instead of the temp working directories as I usually know exactly what I'm dealing with. It's not necessary, however.
Lets setup our first build, a NoSteam Windows build.
The only necessary parameter for this build is the BUILD_OUTPUT directory which specifies where the final build is going to go. (This could probably be moved to the project parameters in hindsight)
My build steps:
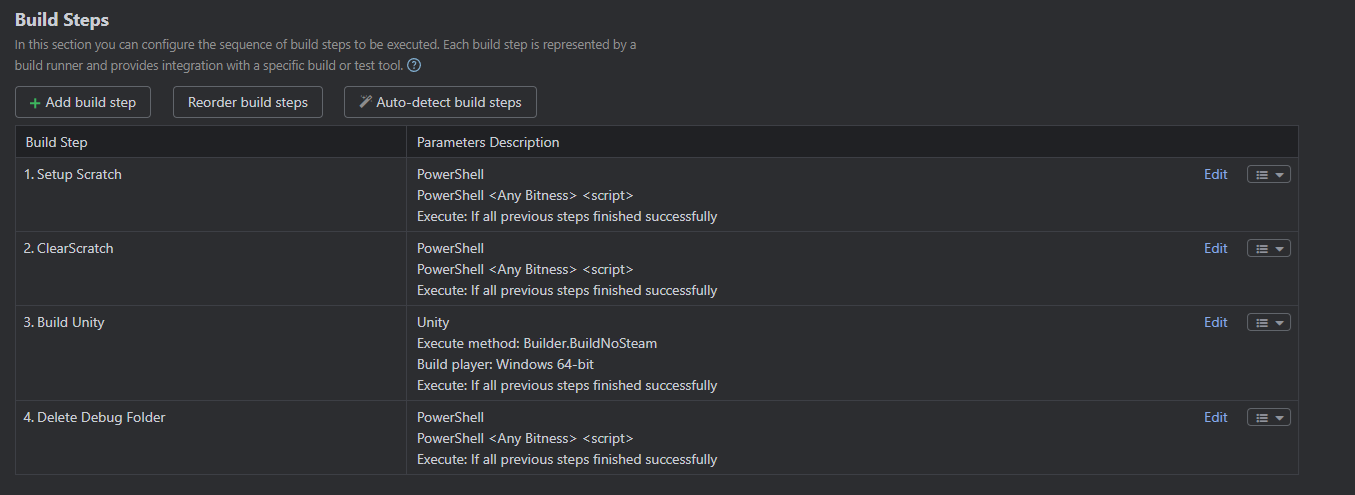
Setting up and clearing scratch isn't necessary if you intend to work purely in the work directory (Which is what I intended to do at the end of the day). Setup scratch just creates the scratch folder if it doesn't already exist, and Clear scratch makes sure that it's empty before we start working.
Here we have the meat and bones of our build, the Build Unity step:
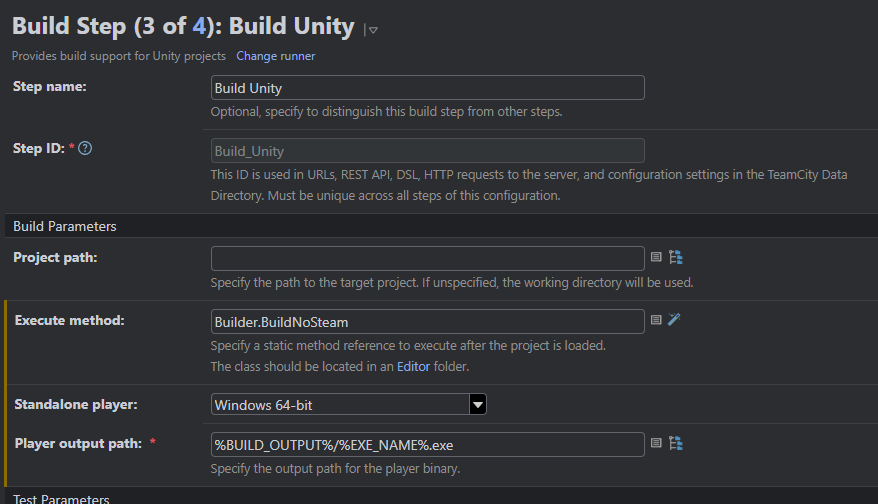
In project path, if you are NOT using VCS then you should put your %GAME_ROOT% path (Where your game is locally stored).
Execute method is the same as `-executeMethod Builder.BuildNoSteam`.
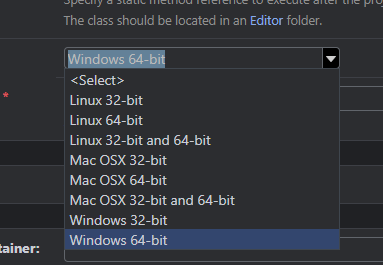
Standalone player is pretty self-explanatory.
Player output path just deposits the built exe/files.
Sidenote: I did encounter a small issue with the plugin here. In Standalone players, you aren't able to build for Apple silicon. It's not a major issue since I don't currently intend to since I have no signing/notarizing capabilities. But it might require a bit of work to add (And you may want to rely purely on CLI if it's necessary for your use-case)
In my general settings I set the following artifacts:
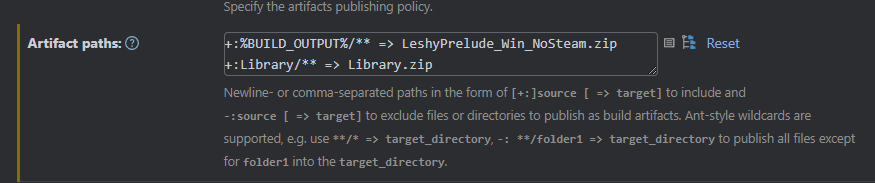
LeshyPrelude_Win_NoSteam.zip has the built no steam version.
I also add the Library as an artifact for future builds. I intend to add the "Library.zip" as a snapshot dependency so we can only update it if it needs to be updated. I'll need to make an equivalent script for this bit of bash magic I normally use on my linux Teamcity insallations:
bash -c 'T=0; while read l; do echo $l; if [[ $l == *"lossless"* ]]; then if [[ $(echo $l | cut -f2 -d":") == "REMOVED" ]]; then zip %DDS_ZIP% -d $(echo $l | cut -f1 -d":" | awk -F "/" "{print $NF}" | cut -f1 -d".")".dds"; zip plc_ktx.zip -d $(echo $l | cut -f1 -d":" | awk -F "/" "{print $NF}" | cut -f1 -d".")".ktx"; else P="$P$(echo $l | cut -f1 -d":")\\n";T=1; fi; fi; done <%system.teamcity.build.changedFiles.file%; echo "T $T"; if [ $T = 1 ]; then echo -e "$P" >> filelist.txt; fi'
The final step deletes the debug folder that gets built (Since we DO NOT want to ship it!)
Anyways, if you run it now, everything should work. If it's your first time building then it will take quite a while, but after everything's done you'll get your artifacts hot and ready for deployment:

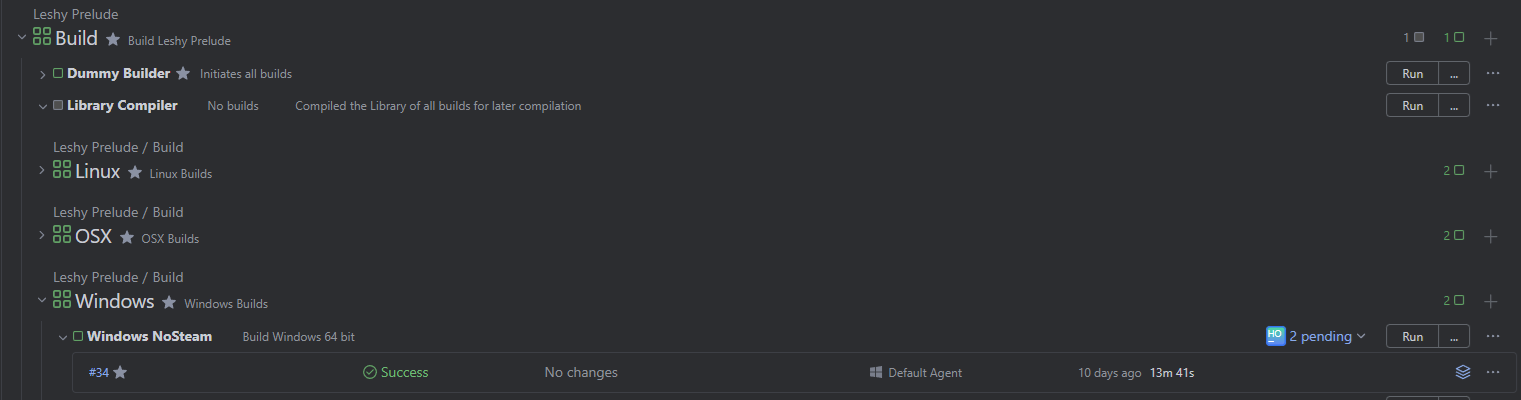
Copy the job and just change the "ExecuteMethod" parameter in your Build Unity step. Repeat the same step for linux/Mac OSX just changing your final zip names and associated build platforms. This can be condensed into fewer jobs, but I like having them separated for ease-of-tracking and changes.
After you've done your initial setup for all platforms then you'll have something along the lines of this:

Clicking all these buttons individually is a pain though, so we can utilize TC build chains with a dummy job.
Behold, the dummy builder:

This job has no build steps whatsoever, it just has a load of dependencies.: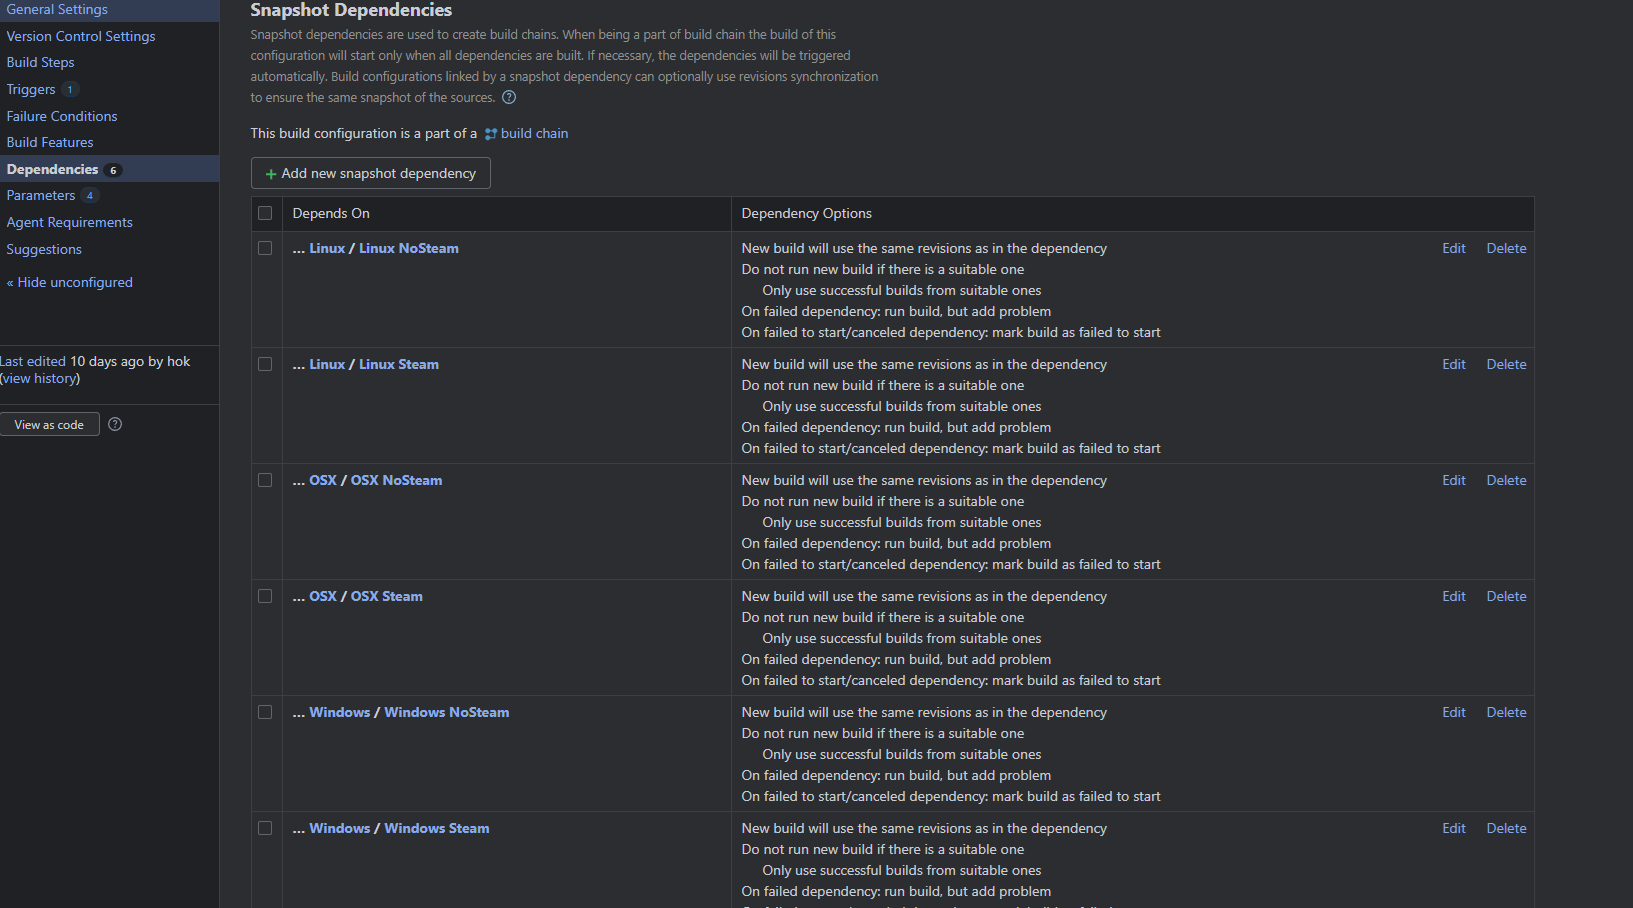
Here you can add/remove platform builds to automatically trigger on whatever endpoint you want. But if you click the Dummy Builder button now, it'll trigger builds on all your jobs. If you're also using VCS, it'll skip the jobs with no detected changes (If you have separate depots/repos per platform).
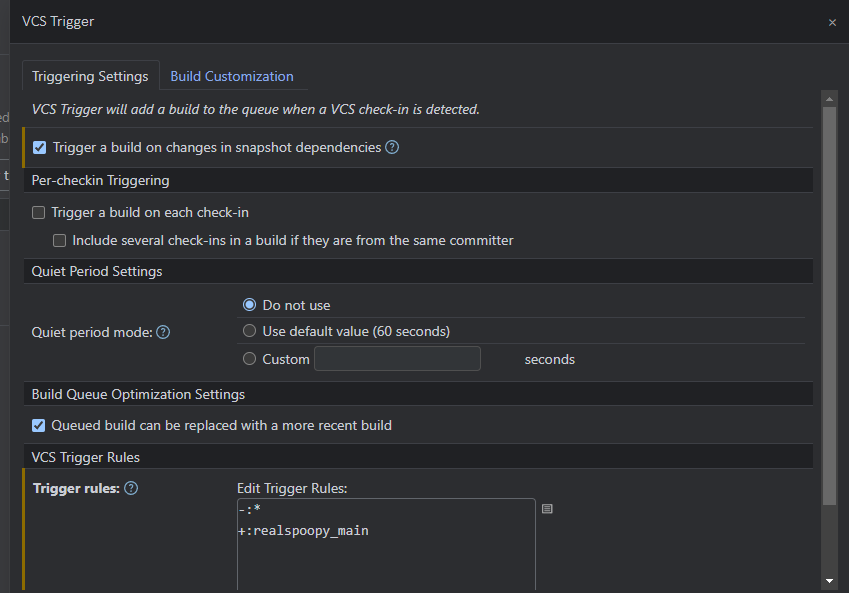
Note: If you're using VCS, and want builds to automatically trigger on push to master/main, make sure you create a trigger for your depot/stream:
There we go! That's essentially it for our Steam/Itch build pipeline. Now we can move onto deployment.
Deployment
Now that we have our built gamesfor all our separate platforms, we need to actually deploy it to itch and steam.
Itch
Since I'm posting this DevLog on Itch, I thought it'd be best To actually start with it.
Itch utilizes a nifty little CLI tool called Butler! Pretty convenient to work with in all honesty.
Make sure you've logged into butler manually AT LEAST once on your target machine before setting up the build configuraton.
For the build parameters you'll need the following:
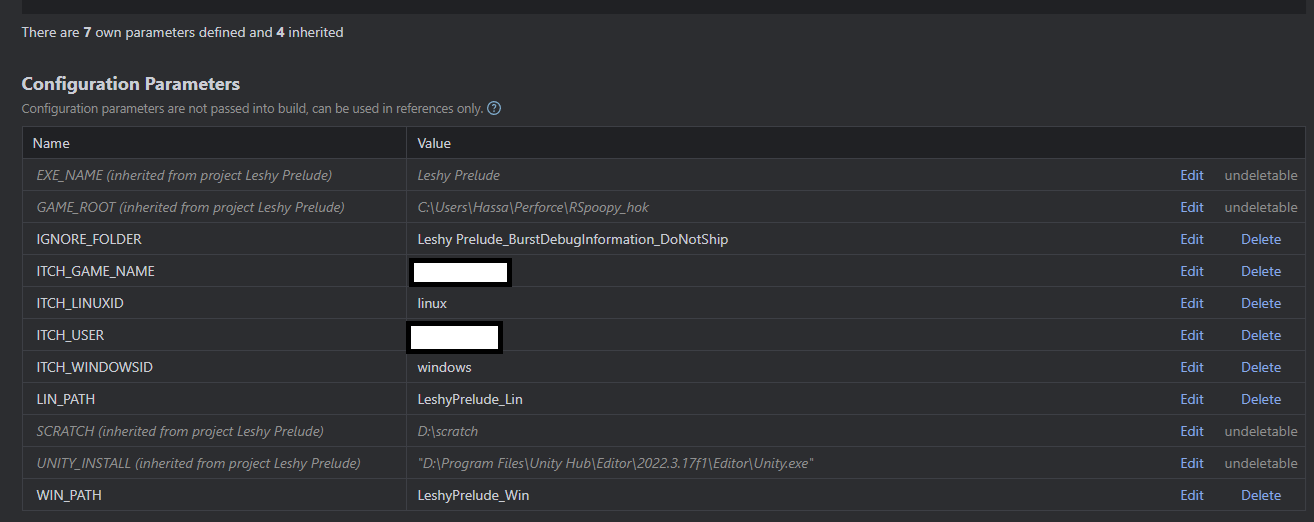
IGNORE_FOLDER will include everything you want to ignore on push.
ITCH_GAME_NAME is the name identifier for your game.
ITCH_USER is your itch username.
LINUX/WINDOWSID is whatever ID you have your windows/linux builds under.
LIN/WIN_PATH are the paths to your builds.
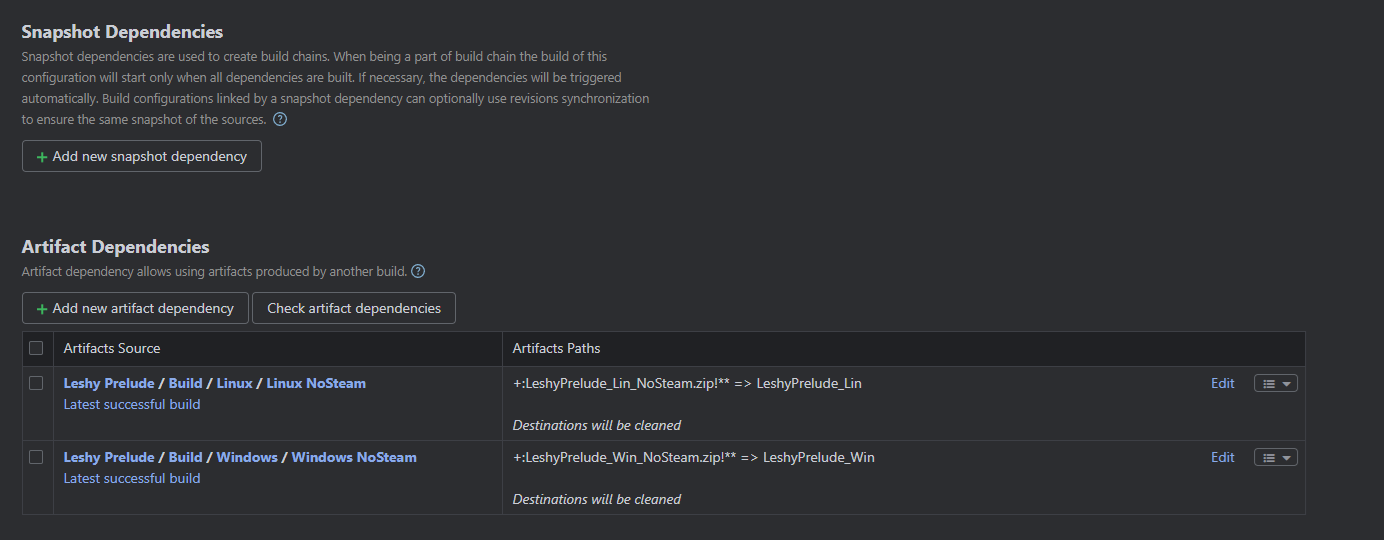
Since I'm only building or Linux/Windows I only have two artifact dependencies and deposit them appropriately:
Two build steps: (Sending separate platforms live could be broken up, however, to allow better configuration)
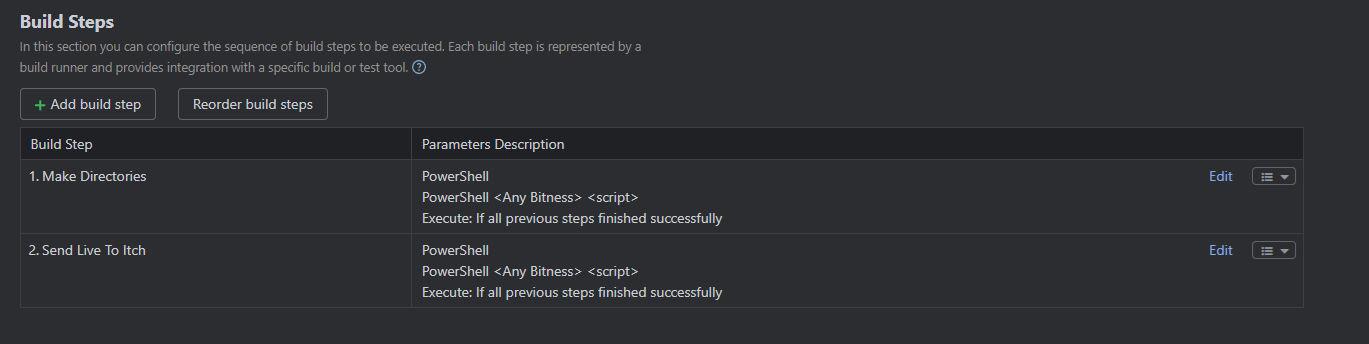
Make directories:
mkdir %WIN_PATH%
mkdir %LIN_PATH%
Send Live To Itch:
butler push ./%WIN_PATH% --ignore "%IGNORE_FOLDER%" %ITCH_USER%/%ITCH_GAME_NAME%:%ITCH_WINDOWSID%
butler push ./%LIN_PATH% --ignore "%IGNORE_FOLDER%" %ITCH_USER%/%ITCH_GAME_NAME%:%ITCH_LINUXID%
And that's it. Really quite straightforward when it comes to itch deployment.
If I run the job now, it'll grab the latest builds from the Windows/Linux NoSteam builds and push them directly live to itch. Note again: You need to login to butler at least ONCE before doing this.
We could have a bit more fun with this such as connecting it to a discord webhook to notify us when it's done, when the build will be live on itch, etc. But we're keeping it simple for here.
Steam
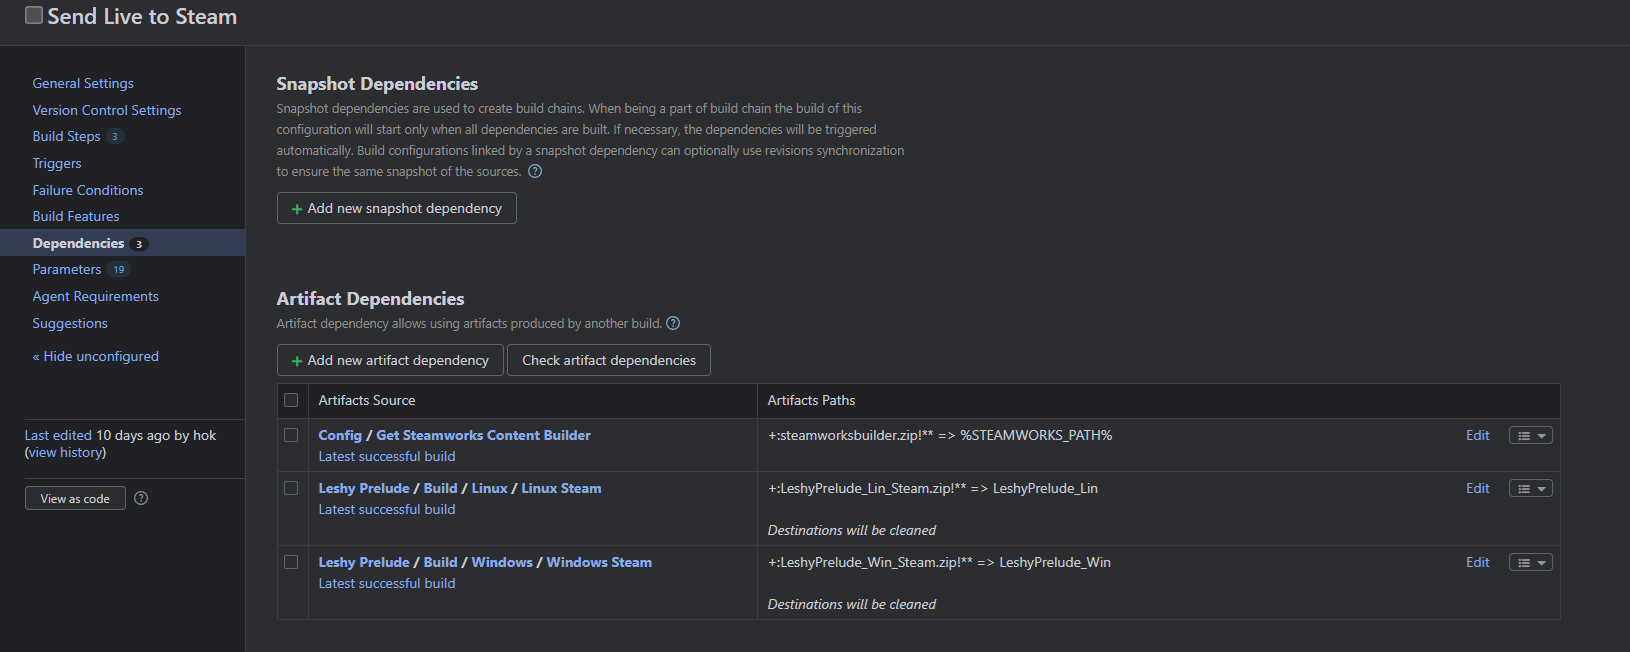
Steam is a bit more complicated... First thing we'll need is to actually store the Steamworks content builder.
I created a Steamworks Content Builder retrieval job as a separate project in config as it'd likely be used for any game that uses steam.

Our Artifact path is as follows:
+:SteamworksContentBuilder/** => steamworksbuilder.zip
And it has a singular build step:
Copy-Item 'C:\dir\to\SteamworksContentBuilder' -Destination './' -Recurse
NORMALLY, I'd have the SteamworksContentBuilder hosted somewhere on a domain that we update for our projects, but since I'm just using my local machine, I directly copy from a local path and store it as an artifact.
You can retrieve the SteamworksContentBuilder from the Steamworks partner page after you've signed up for an SDK license.
Pushing live to steam is a bit more complicated, but their deployment pipeline is extremely robust and configurable.
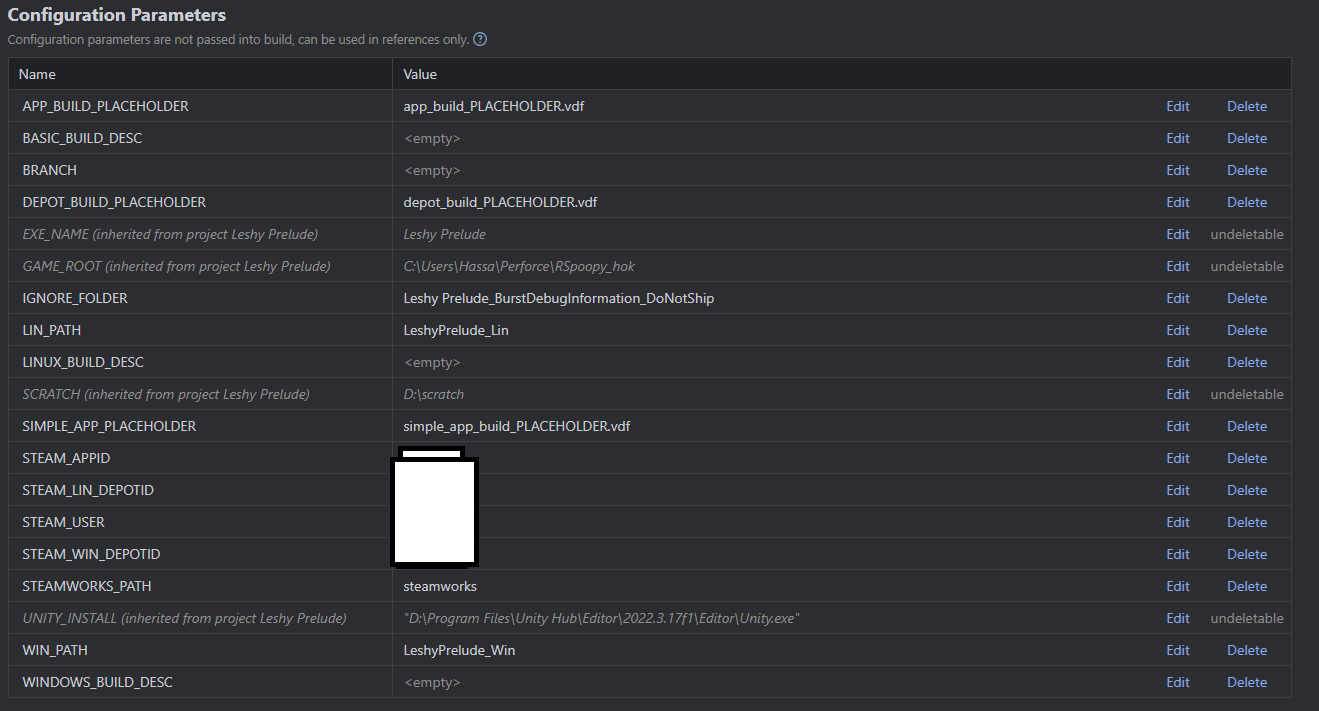
Here are my steam live parameters.
X_BUILD_PLACEHOLDER are placeholder files I create and modify during build depending on the depots/builds I make.
X_APP/DEPOTID are the applications depot/appid that you can find on your Steamworks page.
STEAM_USER is the steam user that's actually partnered and approved to push the game.
The DESC parameters are prompted parameters that you fill out when you run the job.
STEAMWORKS_PATH is where we actually store our content builder via the dependency:
Three build steps here:
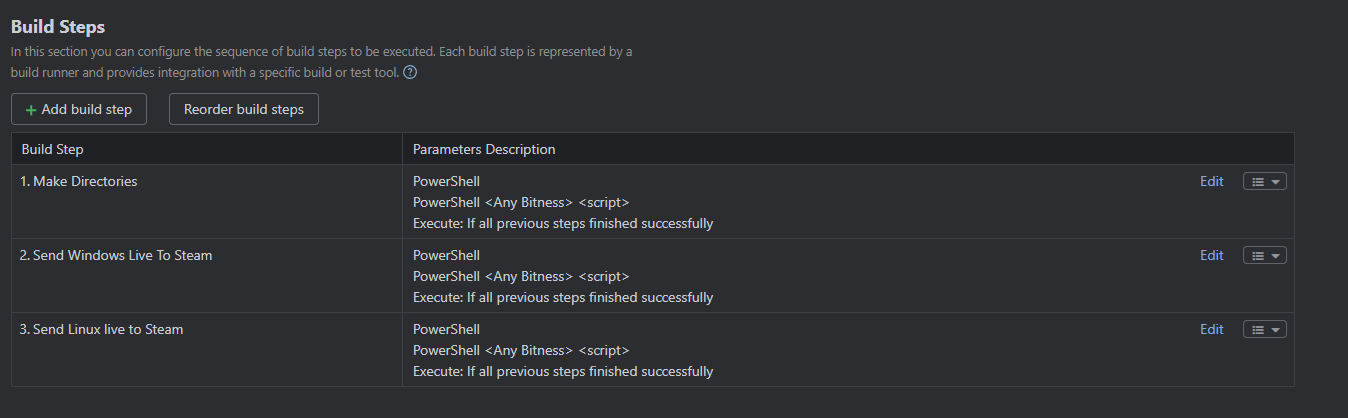
(Note: I'm aware that steps 2 and 3 can probably be condensed into a singular one if I setup the build scripts appropriately, I intentionally kept them separated for now to be able to diagnose issues easily before steam release)
Before I explain these steps, you're going to want to go into your steamworks content builder and duplicate three scripts with corresponding PLACEHOLDERS:
- app_build_PLACEHOLDER
"AppBuild"
{
    "AppID" "APPID_PLACEHOLDER" // Your AppID
    "Desc" "DESCRIPTION_PLACEHOLDER" // internal description for this build
    "Preview" "1" // make this a preview build only, nothing is uploaded
    "Local" "..\..\ContentServer\htdocs" // put content on local content server instead of uploading to Steam
    "SetLive" "BRANCH_PLACEHOLDER" // set this build live on beta branch AlphaTest
    "ContentRoot" "..\content\" // content root folder relative to this script file
    "BuildOutput" "D:\build_output\" // put build cache and log files on different drive for better performance
    "Depots"
    {
        // file mapping instructions for each depot are in separate script files
        "DEPOT_PLACEHOLDER" "depot_build_DEPOT_PLACEHOLDER.vdf"
    }
}
- depot_build_PLACEHOLDER
"DepotBuild"
{
    // Set your assigned depot ID here
    "DepotID" "DEPOT_PLACEHOLDER"
    // include all files recursivley
    "FileMapping"
    {
        // This can be a full path, or a path relative to ContentRoot
        "LocalPath" "*"
        // This is a path relative to the install folder of your game
        "DepotPath" "."
        // If LocalPath contains wildcards, setting this means that all
        // matching files within subdirectories of LocalPath will also
        // be included.
        "Recursive" "1"
      }
}
- simple_app_build_PLACEHOLDER
"AppBuild"
{
    "AppID" "APPID_PLACEHOLDER" // your AppID
    "Desc" "BSD_PLACEHOLDER" // internal description for this build
    "ContentRoot" "..\content\" // root content folder, relative to location of this file
    "BuildOutput" "..\output\" // build output folder for build logs and build cache files
    "Depots"
    {
        "DEPOT_PLACEHOLDER" // your DepotID
        {
            "FileMapping"
            {
                "LocalPath" "*" // all files from contentroot folder
                "DepotPath" "." // mapped into the root of the depot
                "recursive" "1" // include all subfolders
            }
        }
    }
}
You can see that we're putting PLACEHOLDERS over everything that we want to replace in our build steps, this makes it infinitely easier to update/push several separate depots/apps down the line. With a little bit of editing you can even do several depots at once and work with DLC depots. Make sure your Steamworks content builder artifact contains these scripts.
Now I can show the sending live to steam step:
rm -r ./%STEAMWORKS_PATH%/content/*
robocopy /xo /E ./%WIN_PATH% ./%STEAMWORKS_PATH%/content/
$filePath = ".\%STEAMWORKS_PATH%\scripts\%APP_BUILD_PLACEHOLDER%"
$content = Get-Content $filePath
$content = $content -replace 'APPID_PLACEHOLDER','%STEAM_APPID%'
$content = $content -replace 'DESCRIPTION_PLACEHOLDER','%WINDOWS_BUILD_DESC%'
$content = $content -replace 'BRANCH_PLACEHOLDER','%BRANCH%'
$content = $content -replace 'DEPOT_PLACEHOLDER','%STEAM_WIN_DEPOTID%'
$content | Set-Content '.\%STEAMWORKS_PATH%\scripts\app_build_%STEAM_WIN_DEPOTID%.vdf'
$filePath = ".\%STEAMWORKS_PATH%\scripts\depot_build_%STEAM_WIN_DEPOTID%.vdf"
$content = Get-Content $filePath
$content = $content -replace 'DEPOT_PLACEHOLDER','%STEAM_WIN_DEPOTID%'
$content | Set-Content '.\%STEAMWORKS_PATH%\scripts\depot_build_%STEAM_WIN_DEPOTID%.vdf'
$content = Get-Content ".\%STEAMWORKS_PATH%\scripts\%SIMPLE_APP_PLACEHOLDER%"
$content = $content -replace 'APPID_PLACEHOLDER','%STEAM_APPID%'
$content = $content -replace 'DEPOT_PLACEHOLDER','%STEAM_WIN_DEPOTID%'
$content = $content -replace 'BSD_PLACEHOLDER','%BASIC_BUILD_DESC%'
$content | Set-Content ".\%STEAMWORKS_PATH%\scripts\simple_app_build_final.vdf"
Start-Process -wait ".\%STEAMWORKS_PATH%\builder\steamcmd.exe" -ArgumentList '+login %STEAM_USER% +run_app_build ..\scripts\simple_app_build_final.vdf +quit' -nonewwindow
It's pretty straightforward. Clears our the directory, then replaces all placeholder instances with the appropriate values and creates the final scripts. After it's finished, we can run the app build script.
(NOTE: You NEED the -wait parameter if you want the steam logs to populate within Teamcity)
(EVEN BIGGER NOTE: Make sure you send a depot live at LEAST ONCE using your password manually or this will fail. Subsequent pushes from your machine will not require your password)
The same step is used for Linux, but replacing it with Linux values.
When you run this job, your build is not immediately sent live. You can find the builds under the "Builds" section on your steamworks page. From there, you can set it to the default branch and publish it live. It's one extra step which I don't think is easy to automate by design. It makes sense since games on Steam can be deployed to quite a few people and having this one step can be a sanity measure to prevent things from going very very wrong.
And after all that? If I want to build the game, I can just run the dummy builder, and then run the two send live jobs. Time saved, life complete. Though there are some extra considerations if you're pulling from VCS.
VCS/Perforce Considerations
If you intend to use VCS with Teamcity (Which you should in the long run), you'll need to consider the following.
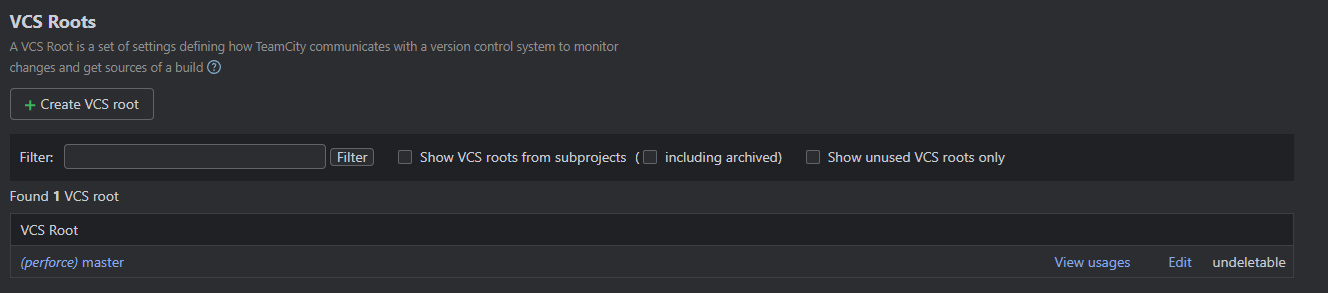
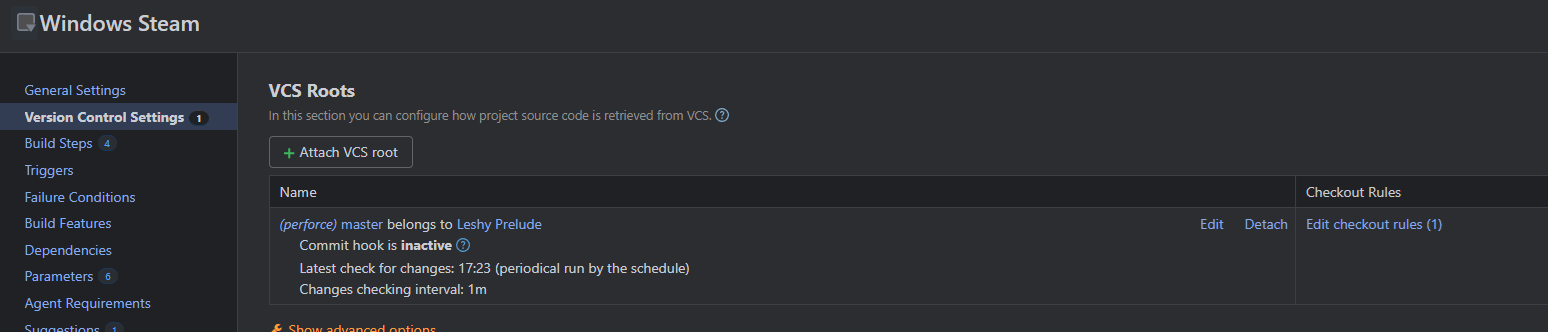
- Make sure you setup your VCS Root for the PROJECT.
For Perforce, specifically, the syntax was slightly confusing when setting up the stream but I put down:
//realspoopy/realspoopy_main
When my depot/stream looks like this:

- The PULLED project needs to be opened at least ONCE manually
The actual project that's pulled from VCS will be completely barebones. If you try building it from scratch, it usually fails at the compilation stage as it can't determine namespaces and such. This is because the `.csproj` files aren't appropriately generated when building from command line. The "Open C# Editor" in the build script was meant to circumvent this, but it's not consistent enough for me to rely on. So opening the built project at least once will make sure that the .csproj files are generated.
- Initial Builds will take a WHILE
If it's your first time building from VCS, it'll take a while as Teamcity will need to update their sources. If your project is big, it can take a few hours.
- Pull from VERSION CONTROL instead of your local install
For each of your build jobs you're going to need to apply the VCS roots which pulls everything or just "+:." in a majority of cases.
This will pull the entire branch into the Teamcity working directory.
What I'd Do Next?
Really the biggest pain-point for me at the moment is the whole .csproj files shenanigans which I'm still trying to find a reliable solution for. Everything else works like an absolute charm and has saved me quite a while. Porting it over to a DigitalOcean droplet would also be a relative breeze. If you're intending to use Git as your VCS, it's pretty much the exact same, but you'll rely on branches instead of streams.
There is also the issue of duplicated space. I diffed some of the platforms out of curiosity and found that there's a LOT of shared data between each platform. Steam lets you have "common" files distributed separately which is space saved on Steam/the consumers end. They do a lot of neat stuff in terms of packaging things appropriately. That's not a necessity however since the game is so small as is, but it's definitely something I'll be looking to refine in the future. I don't want 6 full installs of the game stored on my machine.
Anyways, that's it! I don't think I covered absolutely everything I went through on setting this up, but I feel like I got the essentials at the very least. If you have any questions or suggestions for improvement, definitely leave a comment down below. I do not consider this a final fully fledged solution, but it works for my purposes and saves me a lot of time.
Thanks for reading! I hope this was somewhat interesting or helped you in some way! Definitely check out my project if you have a chance!
Leave a comment
Log in with itch.io to leave a comment.